
How to Diffuse Curly Hair: The Ultimate Guide
How to diffuse curly hair: it seems simple, right? But for many, drying curly hair with a diffuser results in excess frizz and lack of definition. Sound familiar?
If like me, you're too impatient to wait for your curls to air dry (wet hair for eight hours+? No thanks!), diffusing is a great way to speed up the process. As well as drying your curls, diffusing also gives hair volume, definition and bounce. But, you've got to use the right technique - there really is an art to diffusing curly hair.
In this article I'm going to break down how to dry curly hair with a diffuser, providing a few different tips and tricks, as well as some hairdryer diffuser attachment recommendations.
What is a Hair Diffuser?
If you've ever bought a new hairdryer and wondered what on earth the diffuser attachment is, or better yet, left it in the box to gather dust, you're not alone! So, what is a hair diffuser? What's its purpose? And why can't you just use a regular hairdryer attachment to dry your curly hair?
Firstly, regular hairdryer attachments are simply no good for drying curly hair (unless you're after a bouncy blowdry - but, if that's the case, why are you reading this article?!). Because there is nothing to distribute the air, regular hairdryer attachments blast air at one section of hair, which sends your hair's cuticles into a flurry and causes frizz.
Hairdryer diffusers, on the other hand, delicately distribute the air so curls dry evenly, and without excess frizz.
How does Diffusing Create Volume and Definition?
Creating bounce, volume and curl definition when diffusing is all down to technique. By taking the hair, section by section, and gently lifting towards the scalp, you set the curls in place, which helps enhance curl definition and create bounce. Volume comes from the small amount of 'functional frizz' that the air from the diffuser creates as it gently dries the hair.
Can I Use a Diffuser if I'm Following The Curly Girl Method?
While, essentially, the Curly Girl Method recommends refraining from using heat on the hair (Lorraine Massey refers to hairdryers as 'blow-fryers', because the heat sizzles the hair!), it really comes down to personal preference. Sometimes, you need to add a bit of heat to speed up the drying process, and that's okay!
Using a hairdryer with a diffuser attachment on a low heat and low speed setting is, in the opinion of most curlies, absolutely fine. I always diffuse on a low speed, switching between low and medium heat so my hair dries faster.
How to Diffuse Curly Hair: Step by Step
Here's a step by step guide on how to dry curly hair with a diffuser. I always use the 'Pixie Diffusing' technique, which means turning the hairdryer off between sections - more info on that below.
- After applying your styling products, remove excess water with a cotton t-shirt or curl towel.
- Tip your head to one side, take a small section of hair and place it into the diffuser bowl. Gently bring the diffuser up to your scalp, and then turn the hairdryer on.
- Hold in place for thirty seconds, turn the hairdryer off, take another small section of hair and repeat.
- Flip your hair to the opposite side and repeat steps two and three.
- Flip your head forward and repeat steps two and three.
- Once your curls have started to set, you can go in an add some more product (if you feel the need). This is called the 'Smasters' technique. Add a small amount of product in your hands, mix with water, glaze over your hair and lightly scrunch towards your scalp.
- If you have individual curls that aren't curling up so well, you can also go in and add some product to them and finger coil by twisting around your finger in the direction of the curl. Repeat steps two to four.
- [Optional] When hair is 80-90% dry, stop diffusing and add some root clips to help with volume. Leave to air dry the rest of the way.
- If you're not adding root clips, or want to diffuse to 100%, repeat steps two to four until hair is dry.
- Once hair is 100% dry, depending on the products used, you may feel a hard, crunchy cast on the hair - this is completely normal. To release this cast, (and add more volume, regardless of whether you've got a cast or not), flip your head forward and scrunch your hair up - this is referred to as 'scrunch out the crunch'.
- For extra volume, with your head still upside-down, fluff your hair out by placing your fingers at your roots and shaking your hands. I like to use a scalp massager to fluff out my curls at this step, too.
- Flip your head up and arrange curls and parting into place.
Best Diffuser for Curly Hair
The best diffuser for curly hair will depend on your hair type and length. My favourite diffuser for long curly hair is the Xtava Black Orchid (more info below).
If you already have a diffuser attachment (ie. the one that came with your hairdryer) don't feel like you have to spend lots of money on a new one - I used the standard diffuser attachment that came with my Vidal Sassoon hairdryer for a good couple of years before branching out. But, if you think it's time for a new one, I've got a few suggestions below.
I asked my Instagram followers what their favourite diffuser was, and these were the most popular answers:
Xtava Black Orchid Diffuser
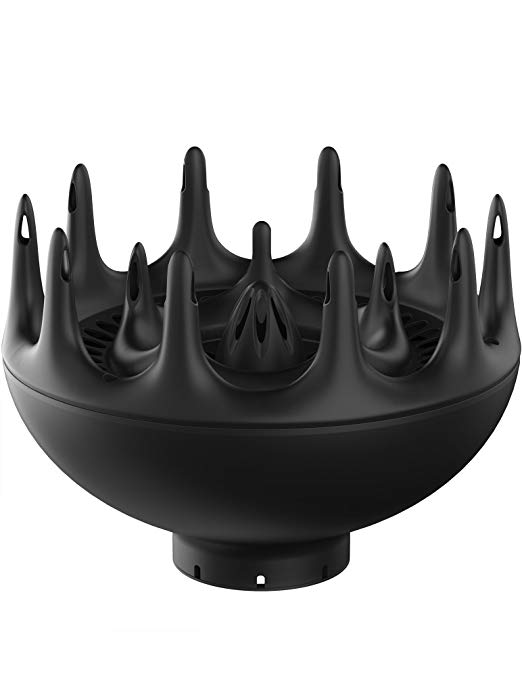
As mentioned above, this is the diffuser I use, and what I've found to be the best diffuser for my hair. Also, when I asked my followers what their favourite diffuser for long curly hair was, the Black Orchid was the most popular response.
The Xtava Black Orchid is great because it has a massive bowl, which means you can fit a lot of hair into it! The prong-to-bowl-depth ratio is also spot on - some diffusers have really deep bowls and short prongs, which can make it hard to achieve any kind of root volume. Other diffusers have a shallow bowl and short prongs, which, depending on the diffuser, can make long curls a little wonky in places.
However, the Black Orchid has both well-sized prongs and a medium-depth bowl. Perfect for defining and volumizing long curly hair.
I also had a fair few followers testify that it's a great diffuser for short hair, too. I've used it on my mum's short hair, and she gets great volume with it!
Pros:
- Has a very large bowl, which, due to the amount of hair it can fit in, helps speed up drying time.
- Its long prongs help lift hair at the root to create volume.
Cons:
- It's not universal, so you'll have to make sure it's the right size for your existing hairdryer, buy a new hairdryer, or tape it on (like me).
- Not available in the UK (that I know of), but mine was purchased through the US Amazon and it arrived with no problems or extra fees.
- Very big, and quite heavy, so not ideal for travelling with.
The Curly Co. Diffuser

The Curly Co. diffuser was a very popular answer on Instagram when I asked my followers what their favourite diffuser for short hair was. However, curlies with long hair have also rated this diffuser!
It's the ideal attachment for travelling with because it's lightweight, collapsible and semi-universal.
Pros:
- Great for short hair.
- Collapsable, so easy to travel with - can fit in your hand luggage, too!
- Helps create both volume and definition.
Cons:
- While it will fit most hairdryer nozzles, the Curly Co is not completely universal. The nozzle diameter is 2.25 inches.
Dyson Supersonic Diffuser
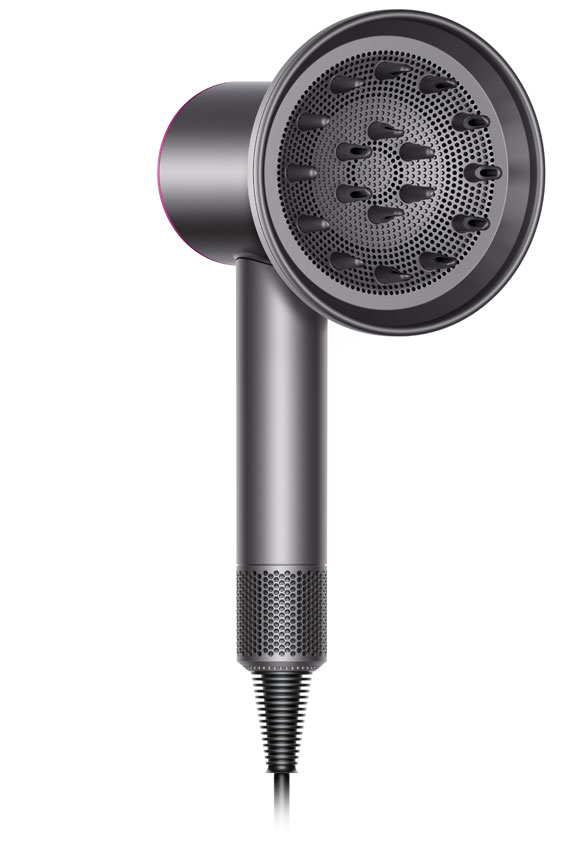
Ahh the Dyson, adored by many and on the wish-list of curlies across the globe. The Dyson Supersonic is a hairdryer with a different kind of drying technology. According to Dyson, it dries hair six times faster than a regular hairdryer through its high-pressure, high-velocity jet of controlled air. It also regulates the heat to prevent extreme heat damage.
The diffuser attachment, although small, works like a charm! My hairdresser dries my hair with it and I still get great volume and definition. But, let's be honest, we're not buying the Dyson Supersonic for its diffuser attachment, we're buying it because diffusing curly takes, what feels like, a lifetime!
Pros:
- Fast drying time. Perfect for those with thick or long hair - or people who do not have the time or patience to diffuse.
- Creates good volume and definition, even on longer hair.
- The diffuser attachment is included, along with a few other attachments, in case you feel like mixing up your style.
Cons:
- Pretty pricey for a dryer, at £299.99!
- Some people have said they don't find it dries hair as fast as it claims to.
DevaCurl DevaFuser

The DevaCurl DevaFuser is raved about when it comes to creating volume. You know that fluffing-out-at-the root thing you do once your hair is dry to create volume? Well, this handy (get it?) diffuser works in the same way.
With most diffusers, we put the ends of our hair in the bowl first, and then raise it towards our scalp. But, this means the ends dry first, and they keep getting warm air blown on them until the rest of our hair is dry - which can lead to damaged ends.
The DevaFuser allows you to dry your roots first, which not only benefits the ends of your hair, but also helps with volume. Our roots usually take the longest to dry, and the longer they are left wet, the more chance there is of ending up with flat roots. But, if you dry your roots first, you'll be left with fab volume.
Then, when you're ready to dry the lengths of your hair, you can gently place a section of hair in the diffuser 'hand' and raise towards your scalp.
Pros:
- Great volume for long, short and medium-length hair.
- Features a universal design that will fit most hairdryer barrels (2.5” – 6.5”).
Cons:
- The hand design can make it hard to dry the lengths of the hair because hair can fall through the gaps. To combat this, you could either use a different diffuser for your lengths or take a leaf out of Spisha's book and only dry your roots.
- Quite pricey for a diffuser attachment!
Gama Professional
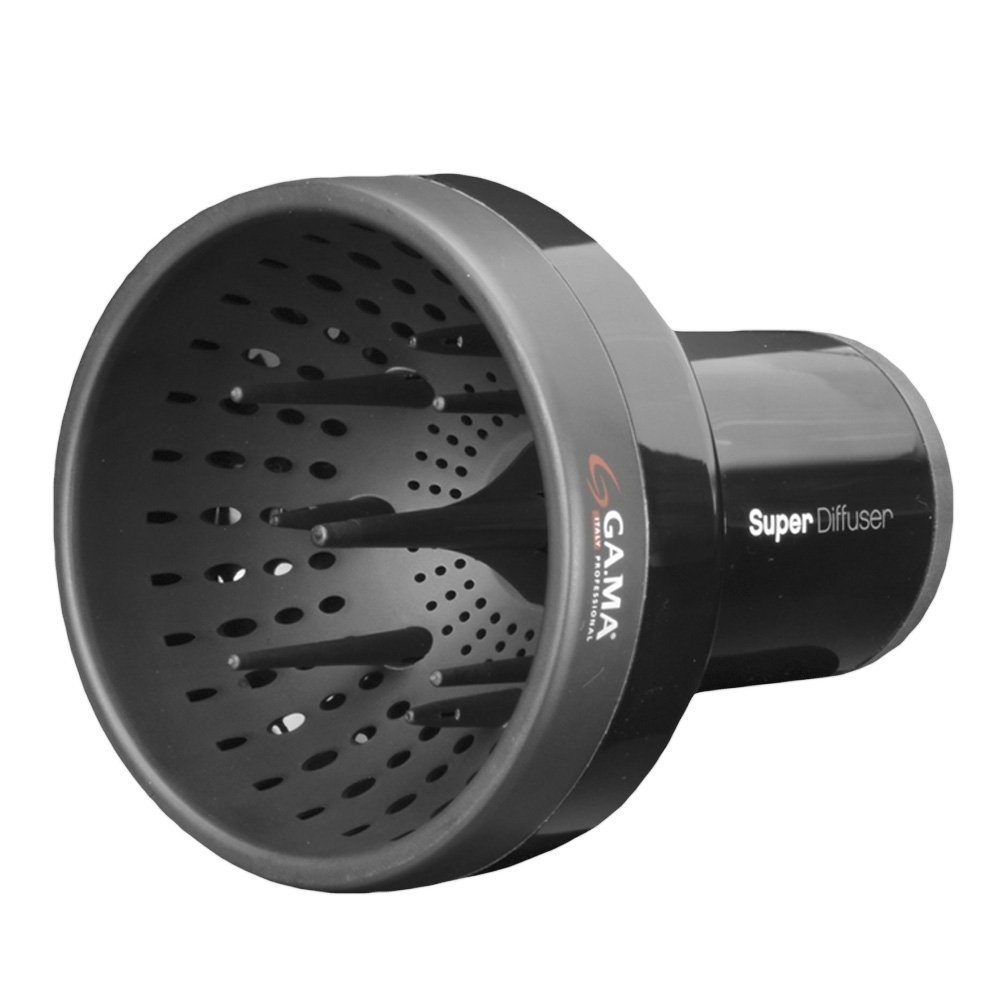
The Gama was another popular diffuser with my Instagram followers, especially for long hair and creating definition. It's a universal diffuser attachment and is much bigger than a lot of other diffusers. The large, deep bowl allows for a lot of hair to be diffused at once.
I have previously tried this diffuser but found that while it gave me good definition in the lengths, the fact that the prongs don't come outside the bowl meant I couldn't seem to achieve any kind of root volume. So, for this reason, I sent the product back. However, I know lots of people love this diffuser, so it could perhaps have been down to my technique, or personal preference.
Pros:
- Universal - fits comfortably on almost all hairdryers.
- Its large bowl has room for a lot of hair, which helps speed up drying time for thick, long hair.
Cons:
- Hard to achieve volume due to the prong-to-bowl-depth ratio (prongs are a little short so you can't lift hair at the root).
Diva Pro XXL Diffuser
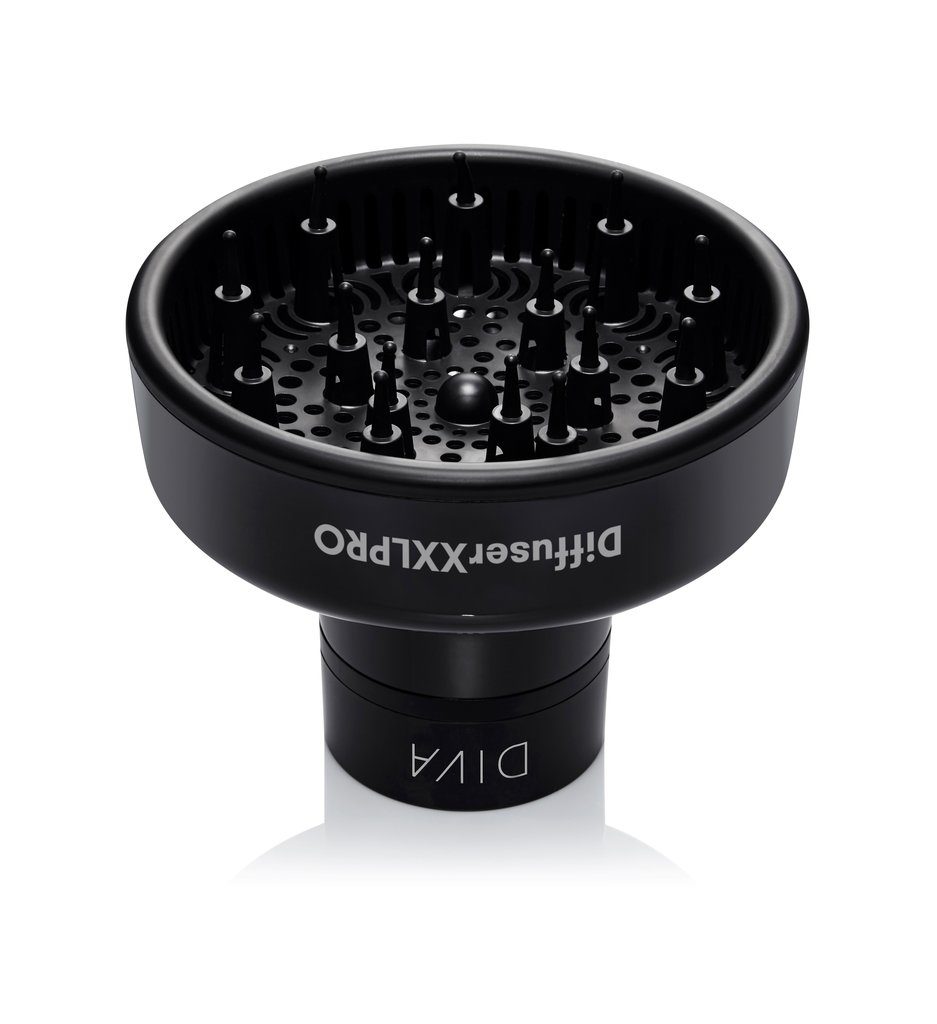
The Diva XXL Pro is another universal diffuser attachment. It has a large bowl that can accommodate a lot of hair, and it's not too shallow so is likely to help create good definition on both long and short hair.
I have seen this used by a curly hairstylist that I follow on Instagram, so if the stylists like it, it must be good!
Pros:
- Deep, large bowl.
- Claims to fit any hairdryer (but this could mean any professional salon hairdryer).
Cons:
- Some reviews state that the diffuser doesn't fit on all hairdryers, so it's best to double-check your dryer's diameter against the diffuser's.
How to Dry Curly Hair if you Don't Have a Diffuser Attachment
If you're new to this whole looking after your curls thing and don't want to invest in a diffuser just yet (but equally don't want to air dry), there are a couple of items/methods you can use to dry your curly hair instead.
- Sieve or Collander: While it sounds crazy, it does work! I tried this once and was pleasantly surprised with the results. This little kitchen essential works in the same way as a diffuser, gently dispersing the air out of the hairdryer, so it doesn't focus on one section and blast your curls.
- Hairdryer, without an attachment: Controversial, I know! I've done this a few times when I've been away without my diffuser, and, if executed correctly, it does dry the hair with minimal frizz. The trick is to keep the hairdryer on a low speed (and low heat, of course), and hold it far away from the hair. Don't shake the dryer about or move it around really fast - slowly move it down the hair, stopping for a few seconds at each section.
From how to diffuse curly hair, to choosing the best diffuser (plus a few crazy suggestions), I think that pretty much covers the entire diffusing topic! Now that you understand how to (properly) dry your curly hair with a diffuser, you'll be able to create volume and definition with minimal - functional - frizz!


7 Comments
Aideen
The Dyson is fab!!!
Claire
I am new to the curly girl method and trying to find my feet..
Is there a specific type of hair dryer that is preferable for curly hair?
What hairdryer do you use?
Thanks for all your info!
Hannah Cook
Hey – I use an old Vidal Sasson one, but I’d recommend making sure to get one with a variety of heat and speed settings so you have the option to use a low speed and low heat. Hope this helps 🙂
Sara
I don’t think the Xtava one is made anymore?? They haven’t updated any of their social media for over 12mo!!
Hannah Cook
Oh gosh, that would be such a shame! Have you checked Amazon/their main website?
Anastasia
Do you find certain blow dryers leave your hair feeling dryer or crisp after diffusing? I borrowed my sisters in a visit and my hair did not feel nearly as good as with mine
Hannah Cook
Hey! I haven’t found this, but I use a low speed and heat. It could potentially be the products you’re using. Some products – gels and mousses, for example, leave a hard cast on the hair when dry, which needs to be scrunched out to reveal soft curls.